Online Ordering Guide

On Line Ordering – Quick Start


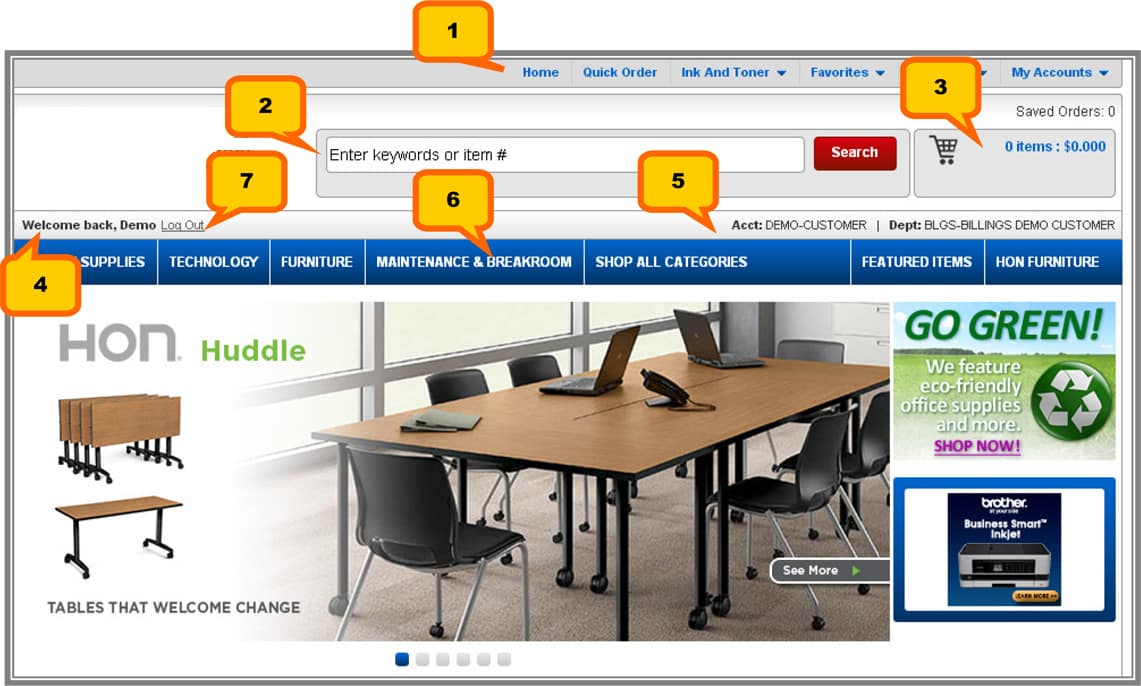
To Log in to the site, go to www.360-os.com, click on the Customer Log In Button at the top right hand side of the page. When the Home page opens, click on the Please Log In link under the 360 Logo and then enter your username and password when prompted. The Home Page will then redisplay and you will have access to your pricing, shopping lists, and history.

The Navigation Bar (1) at the top of the page allows you to access your common tasks quickly, such as Quick Order, your Favorites Lists, Ink and Toner Finder and your Printer Lists, and under My Accounts-Order History, Pay Invoices On Line, Saved Orders and Laundry Lists.

The large box below the Navigation bar (2) is the Search box. Enter keywords or item numbers and then click on the red Search button. As you add items to your cart, the Shopping Cart area (3) will be updated to show the number of items in the cart and the total for your purchase.

Below the Search Box on the left hand side (4) your name will be displayed and on the far right your account number and department (if applicable) will be displayed (5).

The blue tabs (6) under your name are the Browse Catalog tabs. Click on one of the tabs to display the categories and select to view items within the category.

After your shopping is complete and you have checked out, click on the Log Out button (7) next to your name.

At any time, you may click on the Help button at the bottom of the page and select a topic to view information about navigating the site. Additional help is available from Customer Service.

Home Page

To access the site, open your browser and go to www.360-os.com and click on the Customer Log in Button. The Home page automatically opens. The Home page is designed with pull down menus, links, and news.

Links

A series of links display across the bottom of the Home page. Click on the link to use the feature.

About Us Link

The About Us link describes 360° Office Solutions and the services it provides.

Contact Us Link

The Contact Us link provides an email tool. It lets you send an email message to 360° Office Solutions.

Help Link

The Help link lets you view information about each of the features found on the web site. You can learn what the feature is for and how to use it.

Log In

1. Click on the Please Log In link below the 360 Office Solutions logo on the left hand side of the page
2. When the Log In Page opens, enter your user name in the User Name box in the Registered Users area.
3. In the Password box, enter your password. (This box is case-sensitive.)
4. Click Log In. The My Shopping Cart page opens.

TOP NAVIGATION BAR

The Top Navigation bar offers drop down menus for the various features of the site.

BROWSE CATALOG & FEATURED ITEMS TABS

Click on one of the tabs on the Blue Navigation bar below your name to browse the catalog categories.

Purchase Items with a Quick Order

The Quick Order page allows for easy, flexible and speedy ordering. This is an effective tool when you know the item number. You can enter the item number or a partial item number to place it on the order. If you only enter a partial item number, you can select from a list of items that begin with that number.

  1. Click Quick Order on the Top Navigation Bar. The Quick Order page opens.
  2. Click the Item # box and enter the item’s number. If you do not know the item number enter the first part of the number, 100, for example, and a list of items will appear to choose from. Select the correct item.
  3. Click or tab to the Quantity box and enter the quantity of the item to order.
  4. Click or tab to the Comments/Description box and enter comments about the item or an item description. Comments print on the invoice.
  5. Tab till another Quick Order box appears to enter the next item. Continue to enter items as above.
  6. Click on Escape to clear a line item off of the order or click on Clear All to remove all items.
  7. You can save the items to your shopping cart or you can add items to a My Favorites list.
    • To add an item to a My Favorites list, click Save to Favorites. The Adding an Item to My Favorites page opens. Add items to Favorites.
    • To save the items to your shopping cart, click Add to Cart. All of the items on your Quick Order will be added to the cart.
    • To add items to the cart and a Favorites List click the Add to Cart and Save to Favorites button.

Purchase Items from a Favorites List

  1. Select a list from the Favorites drop down menu on the Top Navigation bar. You must have already set up your favorites lists to use this feature.
  2. The detailed list opens.
    • To add all the items on the list to your cart, click Select above the list of items and click on Add to Cart.
    • To select items individually, click the box to the left of each item to purchase. To change the quantity, click the Qty box for the item and enter the new number over the old. To add information about the item such as who it is for, click the Comments box for the item and enter the information. You may click the Add to Cart button after each selection, or after all items are selected.
  3. To review the items in your cart, hover the mouse over View Cart (under the Top Navigation bar on the right hand side of the page) and you will see the recently added items. Or click on View Cart to view all items in the cart and make adjustments if necessary.
  4. To add items from another list to your cart, choose the list under Shop Favorites Lists on the far left. Or to drill down to a category on the current list and display only the items in that category, click on the category.
  5. To view your Favorites List in a different order, click on the drop down arrow next to Sort by on the task bar on the right hand side of the page. You may sort by item description or by item number.
  6. To print the list, click Print. Your list will be printed with pictures, descriptions, and prices.
  7. To check out, click Check Out in the View Cart box.

Purchase Items from Laundry Lists

Use the Laundry Lists feature to place items on an order. This feature allows you to quickly view and choose items you commonly order. 360° Office Solutions has compiled these shopping lists for your convenience.

  1. To access the Laundry Lists click the My Account drop down menu and select Laundry Lists and click on the list you wish to open.
  2. The Laundry Lists page opens. You can sort the list by clicking on the drop down arrow next to Sort by on the task bar on the right hand side of the page. You may sort by item description or by item number.
  3. Or you may select a category to shop from on the left hand side. Click the category that contains the item to purchase. Some of the general categories such as Office Supplies may be broken down in to more categories to choose from For example, to find binders, click on the Office Supplies category, and then click on Binders and Binding Supplies.
  4. A list of items that meet the search terms you specified appear. This includes the item description; an item picture, item pricing information; and the item quantity. Click the item picture or description for more information about the item.
  5. Choose the item by clicking the check box to the left of the item. To the right of each item is the price and the Quantity box. This box lets you enter the quantity of this item to place on the order. Click the cursor in the Quantity box and enter the quantity. For example, to order two, type 2.

Note: The unit of measure for each item is shown next to the price in bold type. That is the unit you are purchasing in. Packaging information is shown in the detailed description and if you want to buy in box or carton quantities, you would order in multiples of the buy unit of measure. For example a pen may have a price listed as $1.00/each. The packaging information says 12-each/box. To order 2 boxes, for example, you would enter 24 (not 2) in the quantity box, since you are buying by the each and there are 12 each per box so 2 boxes X 12 each would be 24 each.

  1. The buttons on the task bar on the Laundry List page provide several options for the item you selected. Add to Cart: This button places the item in your shopping cart. Once the item is in your cart, you can either check out or leave the item there and continue shopping. When you add the item to the cart, the page displays a message under the item quantity how many are in the cart. The Add More button is then displayed under the quantity indicating that you already have placed some in the cart, but you do have the option of adding more.
  2. Add to Favorites Lists: This button adds an item to your list of favorites. By adding items to your list of favorites, you can quickly retrieve the item to order it again in the future. To add an item to a Favorites List, click the box to the left of the item to select, and then click Add to Favorites under the Add to Cart Button or on the top task bar. The system prompts you to add it to an existing favorite list, or you can create a new one. To add it to an existing list, click the Add check box and click the Add to Favorites List button.

Purchase from the Learning Center & Product Showcase

The Learning Center and Product Showcase pages let you view and access vendor product information.

  1. Click Featured Items and select Learning Center or Product Showcase from the blue Navigation Bar.
  2. The page opens, displaying the available vendors. Click the vendor’s information to view. The system opens a separate web page with the vendor’s information you selected.

Purchase Items from Contracts (Custom Shopping List)

Use the Contracts feature to place items on an order. This feature allows you to quickly view and choose items. Based on your past usage 360° Office Solutions has built this custom list for you.

  1. Click the Contracts drop down menu from the top Navigation Bar. Click on the list you wish to shop.
  2. The Contracts page opens. You may choose a Category on the left hand side to drill down to the items you are looking for. Under this text, a list of item categories is shown. Choose Office Supplies, then select Click the category that contains the item to purchase. For example, to select binders, choose Binders and Binding Supplies.
  3. A list of items that meet the search terms you specified appear. This includes the item description; an item picture, if available; item pricing information; and the item quantity. Click the item number for more information.
  4. Or you can sort the list by clicking on the drop down arrow next to Sort by on the task bar on the right hand side of the page. You may sort by item description or by item number.
  5. Choose the item by clicking the box to the left of the item. To the right of each item is the price and the Quantity box. This box lets you enter the quantity of this item to place on the order. Click the cursor in the Quantity box and enter the quantity. For example, to order two, type 2.

Note: The unit of measure for each item is shown next to the price in bold type. That is the unit you are purchasing in. Packaging information is shown in the detailed description and if you want to buy in box or carton quantities, you would order in multiples of the buy unit of measure. For example a pen may have a price listed as $1.00/each. The packaging information says 12-each/box. To order 2 boxes, for example, you would enter 24 (not 2) in the quantity box, since you are buying by the each and there are 12 each per box so
2 boxes X 12 each would be 24 each.

The buttons on this page provide several options for the item you selected.

  1. Add to Cart: This button places the item in your shopping cart. Once the item is in your cart, you can either check out or leave the item there and continue shopping. When you add the item to the car, the page displays a message under the item quantity how many are in the cart. The Add More button is then displayed under the quantity indicating that you already have placed some in the cart, but you do have the option of adding more.
  2. Add to Favorites Lists: This button adds an item to your list of favorites. By adding items to your list of favorites, you can quickly retrieve the item to order it again in the future. To add an item to a Favorites List, click the box to the left of the item to select, then click Add to Favorites under the Add to Cart Button or on the top task bar. The system prompts you to add it to an existing favorite list, or you can create a new one. To add it to an existing list, click the Add check box and click the Add to Favorites List button.

Purchase Items from the Ink & Toner Finder

The Ink & Toner Finder feature makes it more convenient to order supplies for the various machines in your office
by helping you find the right supplies and keeping a list of your machines that is linked to the supplies they use.
You may use it to simply find supplies for a particular machine and then order the supplies by adding to your cart or
you can create a Machines List to bypass the search the next time you need to order supplies saving time.

To use the Machines List feature, your machines must first be added to your Machines List.

  1. To add a machine to a Machines list, click on Ink and Toner on the Top Navigation bar.
  2. Enter information that you have about your machine by Brand, Device (type) or model number.
  3. A list of manufacturers, type, and model numbers will be displayed. Click a Device Type to narrow the search. Choose the entry corresponding to your machine and click on it.
  4. The supplies associated with your printer will be displayed. To add the machine to a Machines List, enter a description that identifies the machine in the List Name box. You might want to put a location or a person’s name associated with the machine to make it easy for you to remember, and then click Add.

To add supplies to your cart from an existing Machines List click on Ink and Toner on the Top Navigation bar and
using the drop down list, select your machine. Click on the machine that you want to purchase supplies for. A list of
the supplies for the machine you have selected will be displayed.

  1. To order all of the supplies for the selected machine, click on Select All.
  2. Or select individual supplies by checking the box to the left of the item.
  3. Change quantity if you need to order more than 1.
  4. Click on Add to Cart.

When the list is displayed, an Alternate Item may be displayed directly below the OEM item if compatibles exist for
the OEM supplies. You can select the alternate (the compatible cartridge) or the original cartridge (the OEM
cartridge.)

To delete a Machines List, click on Ink and Toner. Click on Machine List Management on the right hand side at
the top. Your lists will be displayed. Click on Delete to the right of the machine you want to delete.

Browse Catalog

The Browse Catalog feature displays a list of product categories from which you can choose the items to place on
the order. This is an efficient tool when you don’t know the number of the item, or want to see a list of items that are
available.

  1. Select a Category from the blue tabs under your name on Home page.
  2. A list of item categories opens, Binders and Binding Supplies, for example.
  3. Click on the category and a sub-category list opens. Click the sub-category on the list to further limit your search.
  4. A list of items in the sub category you selected opens. The items are shown with a brief description and picture. The item description appears as a hypertext link. Click it to view additional item information. The product information page opens and you can view additional pictures and more detailed information about the item. To add items to your cart enter the quantity and then click the Add to Cart button.

Note: The unit of measure for each item is shown next to the price; EA means each so you would enter the number of individual items to order. If the unit of measure is BX (box) or PK (package), the product is sold in boxes orpackages of more than one item. For these products, enter the number of boxes or packages to order, not the number of individual items. The Product Information page includes packaging information to help you order in increments of the buy unit.

  1. Under each item, the Add to Favorites and Add to Cart options appear.
    1. To add an item to your favorites list, click Add to Favorites. The Favorites List page opens. Use this page to select an existing favorites list to store the item or create a new favorites list. Click the box corresponding to the existing list or click the Add box to create a new favorites list and specify the list name and comments. When you finish, click Add to Favorites Lists.
    2. To add an item to the cart, click Add to Cart.
    3. Click View Cart to review the items in your cart.

Shopping Cart

The items you have selected and added to the cart can be viewed in the Shopping Cart page. The View Cart summary box at the top right hand side of the page lists the number of items in the cart and provides a running total of your order as you add items. You can view the cart by hovering the mouse over the View Cart and the items in your cart will be displayed without navigating away from the current page. To edit items in the cart, click on the View Cart button and your shopping cart will open. Any changes to quantity or item can be made. You can continue shopping or check out. You can also print a list of items in your cart, empty the cart, save changes or save your order to be purchased later. Click on the Check Out button to complete and submit your order.

Checkout Page

Review and Complete Your Order

  1. Click Check Out.
  2. The Check Out-Order Review page opens. You can change the information shown below for this order.

Click on Edit Account Details to edit the following information:

Billing Account: If you have more than one account, you can select the account to bill this order to.

Specify Cost Center: If your company uses departments or multiple cost center, to change the cost center for this order, click the down arrow in the Specify Cost Center box and select the cost center to use.

Click on Edit Order Details to edit or add the following:

Shipping Address: The Shipping Information boxes already contain an address. To change the shipping address for this order, click Edit. Click the cursor in the Shipping Address boxes (the Name through Zip boxes) and enter the new shipping address over the existing address. Click Update.

Attention: To change the attention’s name for this order, click the cursor in the Attention box and enter the new attention’s name over the existing attention’s name. The attention indicates to whom the order will be directed.

Specify Purchase Orders: To change the purchase order number, click the cursor in the Long PO or Short PO box, and enter the purchase order number.

Additional Instructions: To add special order instructions, click the Special Instructions box and enter the text. You can enter any message to attach to this order. The text you enter prints on the top of the invoice. For example, you could enter the text These Items Are Needed Before Friday

Your Items: This section of the page lets you review the items placed on the displayed order, along with any item commented specified. If your order included a promotional item, it appears in this section of the Checkout page.

Order Summary: This section of the page lets you review the total amount for the items on the order, the shipping amount, the subtotal amount, and the total amount of the displayed order. If your order included a discount, it appears in this section of the Checkout page.

Payment Method: This section allows you to specify how you plan to pay for this order. When your account is set up it is set to the normal payment method associate with the account. To change the payment method, click a payment option to select it. For example, click the Charge to My Account option to be sent an invoice for this order. To pay using a new credit card, click Enter Credit Card Information option. In the Card Type box, click the down arrow and select the card type Visa, for example. Enter the credit card number in the Number box. You do not need to include the spaces. Select the month and the year the credit card expires in the Expiration Date boxes.

When you finish, click on Update Changes to proceed to the Check Out Review Page.

Click on Edit Cart Items to make changes to your order right from the Check Out Page. You may change the quantity, delete an item entirely, or empty your cart. To add items, click on Continue Shopping. Click on Check Out to finalize and place your order.

To save your order and submit it later, click on Save Order.

To submit the order, click Place Order. The Thank You For Your Order page opens. This page lets you print a copy of this order to retain for your records. Before you print a copy of the invoice, make sure your printer is turned on and is online. To print the invoice, click Print. Any comment lines, special instructions, and other information you specified are included.

To begin a new order, click the Continue Shopping button.

To Log Out and end your session click on the Log Out button next to your name.

Add & Manage Favorites Lists

A Favorites List lets you organize your frequently purchased items. You can create new lists, share lists with others in your company, and edit or copy existing lists. You can use the favorites lists to place items on the order.

  1. To order an item from an existing favorites list, click Favorites Lists on the top navigation bar. Choose a favorites list and it will open and the items are available to be added to the Shopping Cart.
  2. To create a new list or to copy, edit, or delete existing Favorites Lists, select Favorites Lists from the top Navigation Bar and then click on Manage Favorites Lists.

Create a Favorites List

You can create a new Favorites list from the Manage Favorites Lists page, the item information page of an item to be added to the list, or from items displayed in the Browse Catalog, Quick Order, Laundry List, Contract List, or the Ink and Toner finder pages From the Manage My Favorites Lists page:

  1. Click Create New List.
  2. Click the New List Name box. Enter a name for this list.
  3. Click the Comments box and enter a description for this list if needed or leave blank.
  4. Click Save.

You can create a new Favorites List from an Item Information or Main Category Browse page:

  1. Click Add to Favorites beneath the description of the item to add to the list. The Add Item to Favorites List page opens.
  2. In the Create a New My Favorites List section, check the Add box.
  3. Click the List Name box. Enter a name for this list.
  4. Click the Comments box and enter a description for this list.
  5. Click Add to Favorites List.

Other Manage Favorites List tools:

Click on Favorites Lists on the top navigation bar. Your Favorites Lists will appear.

  1. After selecting a list to edit, the following actions can be taken:
    1. Click on Add/Edit to add items or edit quantities and comments to items on the list or delete items
    2. To delete a single item off of the list, click on the red X to the left of the item.
    3. Click on Delete to delete the entire list.
    4. Click on Copy to create a new list with the same items and assign it to a new name or add these items to an existing list.
    5. Click on Share to Share the list with other users in your company. Click on Share with All Departments in this Account to share the list with all users for your account, or use the drop down menu to select only certain departments to share it with. Click on the Save button to save your changes.
    6. Click on the List Name to open the list and shop from it

Add an Item to a Favorites List from the Manage Favorites List Page

  1. Open the Manage Favorites List Page
  2. Click on Add/Edit Items to the right of the list that you want to add to
  3. Click the blank Item # box, enter the number of the item to add, and enter the quantity
  4. Click the Comments box and enter text about the item. Auto Save automatically saves the change.

Delete Items From a My Favorites List

  1. From the Manage Favorites Page, click Add/Edit Items next to the right of the Favorites List Name
  2. The Favorites list will open
  3. Click the red X to the left of the item to remove the item form the list.
  4. Auto Save will automatically save the changes

Copy a Favorites List

  1. From the Manage Favorites Page, click on Copy to the left of the list you would like to copy
    1. To copy the list to an existing list, click the box to the left of the list to which to add. Then click the Copy List button
    2. To create a new list, click in the box to the left of the blank box above the Favorites Lists. Click the List Name box and enter a name for the new list. Click the Comments box and enter a description for the new list if desired. Then click the Copy List button to save the new list.

Edit a Favorites List Name and List Comments

  1. From the Manage Favorites Page, click the Green Pen icon to the left of the list name you want to edit.
  2. Click the List Name box and enter the new name over the old.
  3. Click the Comments box to change the description of the list. Enter the new information over the old.
  4. When finished with all changes for the list, click the green Save icon to save the changes.

Delete a Favorites List

  1. Click Delete to the right of the list you want to delete.
  2. At the Are You Sure dialog box, click OK.

Shop from a Favorites List from the Favorites Management Page

  1. From the Manage Favorites Page, click the Name of the list you want to shop from.
  2. The list will open and you can add items to your cart from the list.

Add an Item to a My Favorites List from the Product Information Page

You can add an item to an existing My Favorites List or create a new My Favorites List from items that you have found in the Search or Browse Catalog. When the Product Information Page is open:

  1. Click Add to Favorites below the Add to Cart Button
  2. Select a Favorites List to add the item to (Or create a new list)
  3. The item will automatically be added to the list and the Favorites Lists Management page will reopen
  4. To Edit the quantity or comments, click on the Add/Edit Items to the right of the list
  5. Click the item’s Comment box and enter comments about the item
  6. Click in Quantity box to edit the quantity
  7. Auto Save will automatically save the change

Enhanced Search

About Enhanced Product Information

The Product Information page displays all the information about an item, including the item number, manufacturer,
picture, description, technical specifications, and price. You can:

  • Add an Item to a Favorites List from the Product Information Page. Click Add to Favorites.
  • Add the item to your cart. Enter the number to purchase in the Quantity field, click Add to Cart.
  • View the technical specifications of the item. Click on the Item Description (it is in blue) Click the Technical Specifications tab.
  • View similar products suggested by your dealer. Click the description of a product listed under Also Consider on the right hand side to view its Product Information page.
  • View specialized information about the product, such as Safety Data Sheets, manufacturer rebates, warranties, and additional views. Click the Item Description. The Product Information Page will be displayed. Click on any of the tabs below the product image.
  • View a larger image of the product from the Product Information Page. Hover over the picture of the item to Zoom. Move the mouse to see various areas of the image, or right click on the image and choose Open Link in a new window to see the complete image in a larger size.
  • To Print the page. Click on the Print button on the upper right of the Product Information Page.
  • To return to the previous page, click the Back button (arrow) on your Browser, or click on the product category on the upper left of the Product Information Page and you will go back to the product category you were shopping from.

Using Enhanced Search

  1. Enter the item key word or key words or the item number in the prominent Search box at the top of the page.
  2. All items matching the criteria you specified display. Chose the item most closely related to your search. The Filter Search Results box displays on left of the screen, containing options for narrowing your search. The current criteria appear in the top of the box, under the title You’ve Selection.
    • To narrow your search further, select from one of the Categories shown.
    • To narrow by manufacturer or brand name, choose a brand from the drop down list. Top manufacturers are listed, with the number of items corresponding to each brand shown in parentheses behind the brand name. To see all possible manufacturers that meet your criteria, click See More. An alphabetical listing of manufacturers opens. To show only top brands again, click See Less.
    • To narrow by another feature, choose one of the lists of attributes. Features specific to the items matching your previous search criteria are listed. The number of items corresponding to each feature is listed in parentheses beside the name.
    • To find items corresponding to an additional keyword, item number, or manufacturer, enter that criterion in the Search These Results box below the list of attributes and click the Go button.
  3. After criteria have been added, they appear in the You’ve Selected area of the box. To remove a search criterion, click X beside it. If you remove all of the criteria you have drilled down to, all possible options will reappear. To search by a different keyword, item number, or manufacturer, de-select the original search criteria. Or, type a new keyword into the Search box at the top of the page.
  4. You may compare up to 4 items. Click the box beside each item to compare, then click Compare button above the item listing. A new window displays detailed information on each of the items, side by side, such as Marketing Information, Packaged Quantity, Product Type, and Weight. Depending on your Internet Browser settings, you may have to change your security settings to allow Pop-Ups to use the Compare Feature.
    • To remove an item from comparison (if you have selected more than two items), click the check box for the item to remove, and click Remove Item.
    • To view a larger image of an item, hover the mouse over the image to zoom.
    • You may add items to your cart or to your Favorites list from the Item Comparison Page.
    • When you have completed your comparison, click the Back button to return to the Product Listing Page.
  5. Click the item description on the list to go to the item’s Product Information page.
  6. To add items to your shopping cart or your Favorites List, click the box to the left of the item, enter the quantity and comments and then click on the Add to Cart or Add to Favorites button.

Order History & Saved Orders

You can view previous orders using the Order History feature. Using the My Orders page, you can add items to your cart as well as a favorites list. You can also limit the orders that display using the basic and advanced search options. You can view incomplete orders you have started and which have been saved using the Saved Orders feature.

Saved Orders

  1. Select My Account from the top navigation bar and click Saved Orders.
  2. The Saved Orders page opens.
    • To view line items on the saved order, click . You can also click to item number to view the Product Information page. Click to collapse the list again.
    • Click the Move button to merge the saved order with the other items already in your Shopping Cart. If your cart is currently empty, the items appear in your Shopping Cart. If your Shopping Cart has items, you receive the following options:
      Merge: The saved order items will be added to the existing cart items.
      Replace: Pick this option to empty your cart of all previous items and add the items only from the saved order. The order previously in your cart will be discarded and will be replaced with the saved order.
      Switch: Click this option to empty your cart of all previous items and add the saved item order to your cart.
      The order previously in your Shopping Cart will be saved and will be accessible from the Saved Orders page.
      Cancel: This option will return you to the Saved Order page without altering your Shopping Cart.
      Submit: Click this button to execute your choice
    • To Copy the Saved Order and still retain it in your Saved Orders to use at another time click on the Copy Button . You will receive the following options:
      Merge: The saved order items will be added to the existing cart items.
      Replace: Pick this option to empty your cart of all previous items and add the items only from the saved order. The order previously in your cart will be discarded and will be replaced with the saved order.
      Switch: Click this option to empty your cart of all previous items and add the saved item order to your cart. The order previously in your Shopping Cart will be saved and will be accessible from the Saved Orders page.
      Cancel: This option will return you to the Saved Order page without altering your Shopping Cart.
      Submit: Click this button to execute your choice
    • To delete a saved order, click the scroll bar at the bottom of the list to display the Delete option. Click the Delete icon . A Confirm Delete message pops up, “Are you sure you want to delete this order?” Click OK to delete the order To add a saved order to your Shopping Cart, click Open.
  3. To view completed orders, see Order History.

Order History Display and Search

  1. To View submitted orders, click on My Accounts on the top navigation bar, and select Order History. The My Orders page opens, displaying the History tab.
  2. Your orders are displayed chronologically from the current date in descending order.
  3. The status of the order is shown in the Status column. Hover over the icon to display the status.
  4. To View an invoice, click on the View icon .The invoice will open and you can print a copy of the invoice.
  5. To view individual items on an invoice, click the button to the left of the invoice number to expand the order.
  6. You may add items to your Shopping Cart or to a Favorites List from Order History when you are viewing individual items. Click the box to the left of the item and then click the Add button to add to your shopping cart. Click on the Add to Favorites Button above the list of invoices to add the item to a Favorites List.
  7. Click on the Search Tab to search for orders using any of the methods described below. An order must meet all the limits you set to be included.
    1. To search by date, click the box to the left of Custom Date and choose the time period when the order was placed by using the Calendar Picker and selecting a starting and ending date.
    2. To search by department if your company uses departments, use the Department drop down list to select the department number. To include all departments, click the Search All Departments check box.
    3. To search by item number, click the Item Number box and enter the item information.
    4. To search by Purchase Order number enter the Purchase Order number in the Purchase Order box.
    5. To search by Invoice Number, enter the invoice number in the Invoice Number box. All other limits will be excluded when using the invoice number,
  8. Click Search.
  9. All orders that meet the limits you specified display in the History tab.

Edit Profile

  1. Select My Account and choose Edit Profile.
  2. Click your First Name, Last Name, Email Address, Email format, or Phone Number and Extension, and enter your new information.
  3. To change your password, click Change Password. The Change Your Password page opens.
    • Click the Password box and enter your existing password.
    • Click the New Password box and enter your new password.
    • Click the Confirm New Password box and enter your new password again.
    • Click Change Password.
  4. To change your security question, click Change Security Question.
    • Click the Current Password box and enter your password. (This verifies your authority to change the security question.)
    • Click the down arrow in the Security Question box and choose a new question.
    • Click the Security Answer box and enter the answer to your question.
    • Click Change Question to finish.

Log Out

Click Logout next to your name on the Home Page. Your user name is logged out and session ends.

Automatic Session Logout

The system allows 60 minutes that a user can be inactive before being automatically logged off. If you click the X at the top of your browser page or Close instead of logging out, any items in your shopping cart will be lost.

Always go to the Check Out Page and click on Place Order. Save Order or Empty Cart before ending your session and then Log Out.

If you leave your session inactive for over 60 minutes, you will receive a session time-out notice. If you have any orders in process, the order is saved. To access saved orders, log back into the web site and select Saved Orders from the My Account or My Orders pull down menus at the top of the page.

Pay for Previous Purchases On Line

The Pay Invoices page lets you review and print outstanding balances in either 30/60/90 day formats. You can use this page to generate a remittance form with the specific invoices you intend to pay, allowing for quicker turn around for your receivables. You can also use this page to pay your invoices by credit card. Each of these options is described below.

  1. Click My Accounts and select Pay Invoices.
  2. Select the invoices to view by clicking the Current, Over 30 Days, Over 60 Days, or Over 90 Days tabs.
  3. To view invoice line item detail, click to the left of each invoice.
  4. Click the check box corresponding to the invoices for which to print a remittance form or pay by credit card. To select all the displayed invoices, click the All check box. To print a remittance form, click Print Remit Form. The form opens as a PDF. Click the File menu and select print, or type Ctrl + P.To pay by credit card, click Pay By Credit Card. The Cost Center and Payment Method boxes open. To change the cost center information, click Edit. Enter the new address. Click Save. To specify the credit card information, click the down arrow to select the credit card type, Visa or Master Card, for example. Then specify the credit card number, and its expiration date. When finished, click Process Payment.

Choose Account-Change Cost Center or Department

The Choose Account option appears under the My Accounts menu. This feature allows you to select the department or cost center for the order you are creating. This feature is beneficial if you have several delivery locations or need to separate items by cost centers. You may also select specific items and assign them different cost centers within the order you are placing to create separate orders for each cost center without completing the current order and starting a new order for a separate department.

You are assigned a default cost center and it will display next to your account number on the right hand side of the screen above the blue navigation bar.

If you need to change the department for the current order:

  1. Click the down arrow in the My Accounts menu and click Choose Account. The Change Account web page opens.
  2. Your current account number, department and attention name display on the left under Current Account/Department.
    • To change the department or cost center for an order, click in the Department box under Select Different Account/Department and start typing the department number or click the Space bar to view all departments you are assigned, and then click the department to use for this order.
    • If your company uses attentions to designate where an order should be delivered, click in the Attention Box and start typing the name or click on Space to view all, and click the attention to use for this order.
  3. When finished, click Continue.

Change Item Departments: My Shopping Cart

To change a department for an item that has been added to the cart, open the Shopping Cart, and then click the Dept box and enter the new item department. Continue Shopping. Additional items will be added to the department you chose at the beginning of the order. You can view your shopping cart to see your order summarized by department. At Check Out, your order will be separated into the different cost centers or departments you have selected and a summary of each will be displayed. You will receive a separate invoice
for each cost center or department.


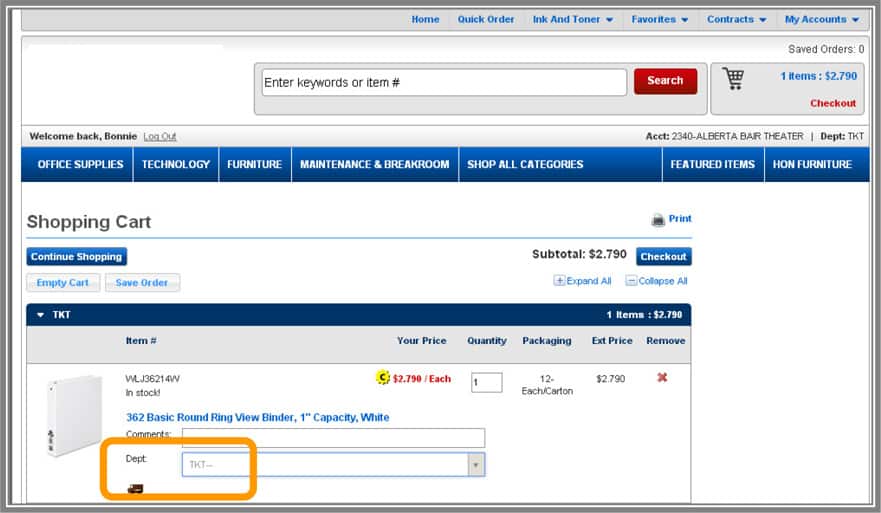
Specify Cost Center: Check Out-Review and Complete Your Order

On the Check Out Page, to change the cost center for this order click on Edit Account Details to specify a new department or click the Expand All button if multiple departments have been selected and select the new department.Click on Apply to make the change. Then click on Place Order to submit your order.

Credit Return Request

Item Return Requests can be processed from the site.  Proceed to one of three areas from My Accounts on

the top Navigation bar:

  • Order History page
  • Items Recently Purchased
  • Credit Return

Accessing the Credit Return Form from the Order History Page

You can select items to return from the Order History page.  After logging in, go to the Top Navigation Bar and hover the cursor over the My Accounts drop-down menu and select Order History.

Find the order the items were purchased on, then expand by clicking on the Plus icon to view all of the items on the order. Click the box to the left of the item you want to return, and click the Credit Return Button. When the form opens, boxes are automatically completed with the available data, including the item number, item description, order quantity, shopper details, and so on.  Please change the quantity if you don’t want to return all that you received. Also, please enter a reason for return in the Comment Box next to Reason 1. You can add an additional line by selecting Reason 2.

Accessing the Credit Return Form from the Items Recently Purchased

In addition, you can submit a Return Request from the Items Recently Purchased page.  After logging in, go to the Top Navigation Bar and hover the cursor over the My Accounts drop-down menu and select Items Recently Purchased.

When the page opens, click the box to the left of the items you want to return and click the Return button at the bottom of the page.  When the form opens, boxes are automatically completed with the available data, including the item number, item description, order quantity, shopper details, and so on. Please change the quantity if you don’t want to return all that you received. Also, please enter a reason for return in the Comment Box next to Reason 1. You can add an additional line by selecting Reason 2 and entering the reason in the Comment Box next to Reason 2.

Accessing the Credit Return Form from the My Account Menu

After logging in, go to the Top Navigation Bar and hover the cursor over the My Accounts drop-down menu and select Credit Return.

When the Credit Return Form opens, all the boxes are blank and must be manually completed. This is useful when you need to request a return for an Item that is no longer available, or you can’t find the item in your history. The Credit Return Form opens. Enter as much information as you have about the item and your account. When finished entering the information, click submit to send the form. 360 Office Solutions will process your request.

Recurring Orders

The Recurring Orders feature offers the convenience of automatic order submissions. Set recurring order dates, change the recurring order name, edit additional order options, as well as reschedule or cancel recurring orders at any time. The system treats a recurring order as a normal order but with a specific delivery date and frequency that you set up. The system also automatically assigns a unique, sequential order number, beginning with RO for recurring order, followed by the number RO-0026, for example.

Checking Out with Recurring Orders

Log into the website. Place items in cart as normal and then go to the Checkout page. When the Checkout page opens, click on Yes! Start a Recurring Order to create a recurring order.

The system defaults to one week. To change the time click the down arrow and choose the frequency.

Like normal orders, before click­ing Place Order, you can add, change, or delete line items. You can also specify order options, such as credit card details, attentions, shipping, and purchase order information.

When finished, click Place Order.

The Checkout Confirmation page opens, displaying the normal order number submitted as well as the recurring order number, RO-0026, for example.

You will receives two emails; a regular order confirmation email and recurring order creation email.

The recurring order also flows through the approval process if approval is required.

Managing Recurring Orders

Go to My Accounts, Manage Recurring Orders to change the frequency, or to reschedule a delivery date. Click on the Recurring Order Number you wish to change, and then make the adjustments needed.

Start typing and press Enter to search

Shopping Cart